
Creating a Campaign
Campaigns and Actions
Section titled “Campaigns and Actions”A campaign is a folder. An action is the thing that actually sends.
Engage separates the two deliberately. A campaign is a container with a name and a description — Member Retention, Event Participation. It sends nothing on its own.
Inside it sit one or more actions. An action is a complete outreach: who it goes to, who it comes from, what the email says, what question it asks, and what happens when a member clicks each answer. Running an action is what generates messages.
The whole path from nothing to a sent message looks like this:
| Step | What happens |
|---|---|
| 1. Create a campaign | Name and describe the effort. |
| 2. Add an action | Pick a type, choose the segment and sender, write the email and question. |
| 3. Preview | See the email exactly as a chosen member will receive it. |
| 4. Run the action | Engage generates one message per member in the segment. |
| 5. Approve | Messages wait in Requires Approval until someone releases them. |
Opening Campaigns
Section titled “Opening Campaigns”- Go to Datascout Engage and log in with the credentials provided by the Datascout team.
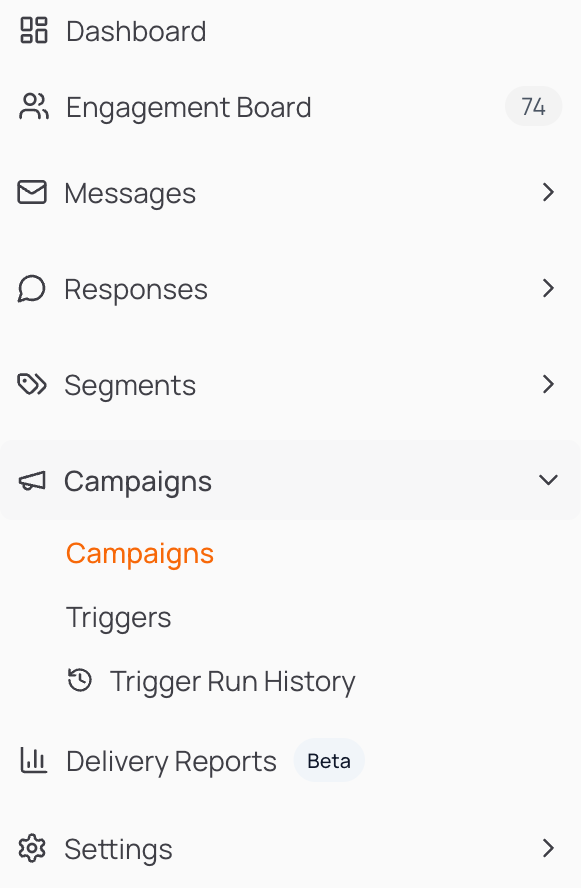
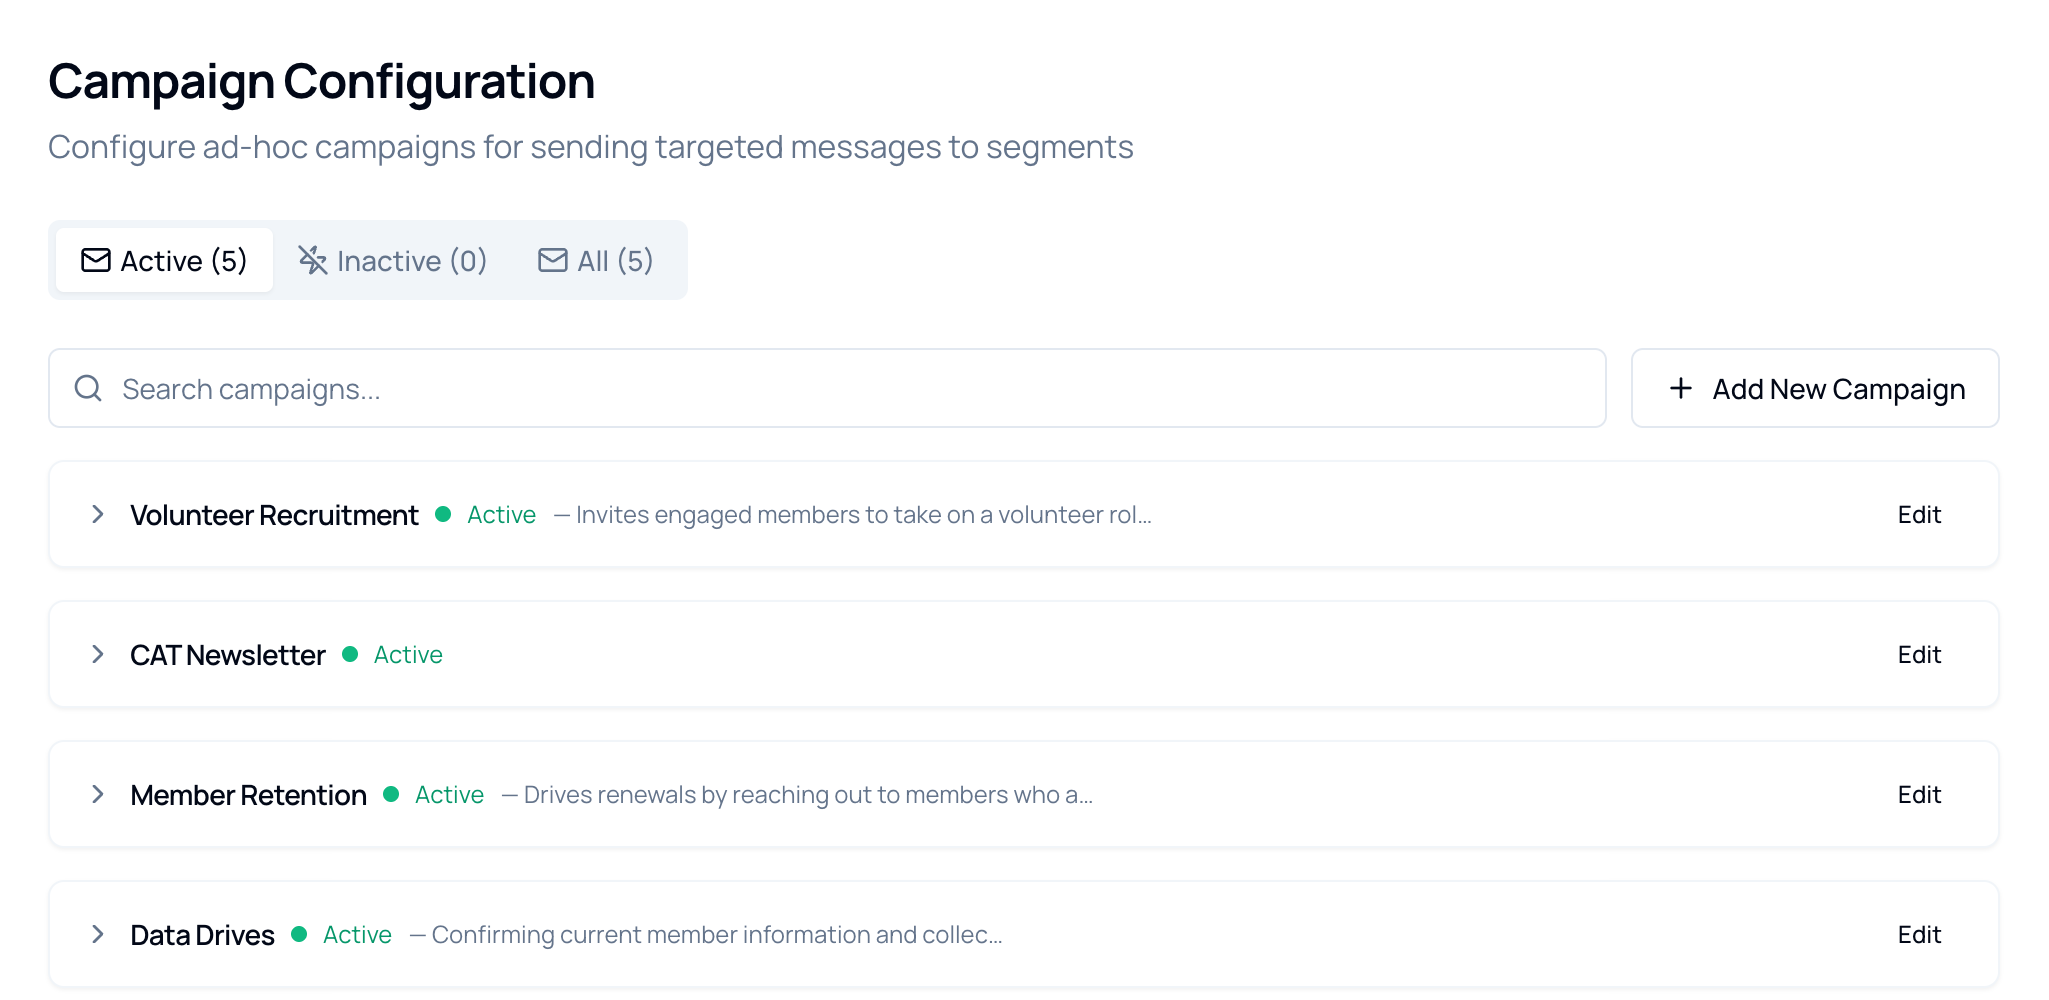
- In the left sidebar, open the Campaigns section, then click Campaigns inside it.
Creating a Campaign
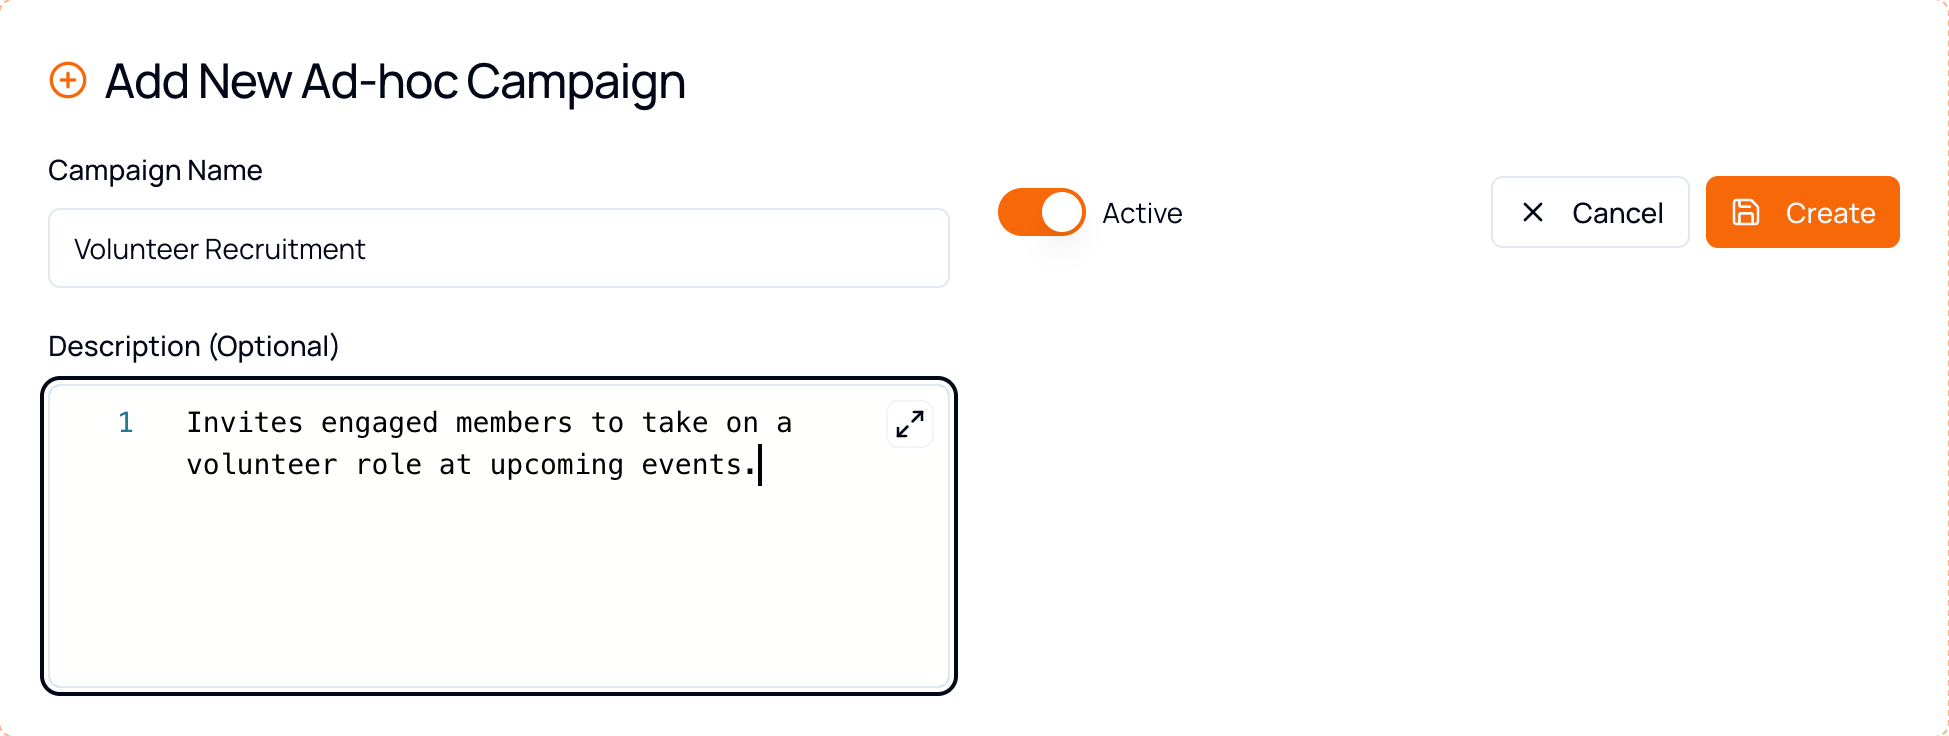
Section titled “Creating a Campaign”- Click Add New Campaign. A form opens inline at the top of the list.
- Enter a Campaign Name.
- Optionally add a Description — worth doing, since it is what colleagues see in the list.
- Leave Active switched on unless you are preparing something for later.
- Click Create. The campaign appears in the list, ready for its first action.
Choosing an Action Type
Section titled “Choosing an Action Type”Click Add Action on your campaign. The first decision is the type — it changes the rest of the form.
- Templated Message — you write the email. Every member receives the same words, with their first name merged in. Full per-response control over tags and routing.
- Template Builder — same idea, but the body is built visually from drag-and-drop blocks instead of plain text.
- AI-Generated — you write instructions rather than an email. Engage composes each message individually using the member’s own profile.
Templated Message is selected by default and is the right choice for most outreach — it is predictable, and you can see exactly what will be sent.
| Choose | When |
|---|---|
| Templated Message | The wording matters and should be identical for everyone — announcements, invitations, renewal notices. |
| Template Builder | You want a designed email with images and structured blocks rather than plain paragraphs. |
| AI-Generated | The message should feel one-to-one and reference each member’s own situation. |
Setting Up the Action
Section titled “Setting Up the Action”Five fields sit at the top of every action, whichever type you pick.
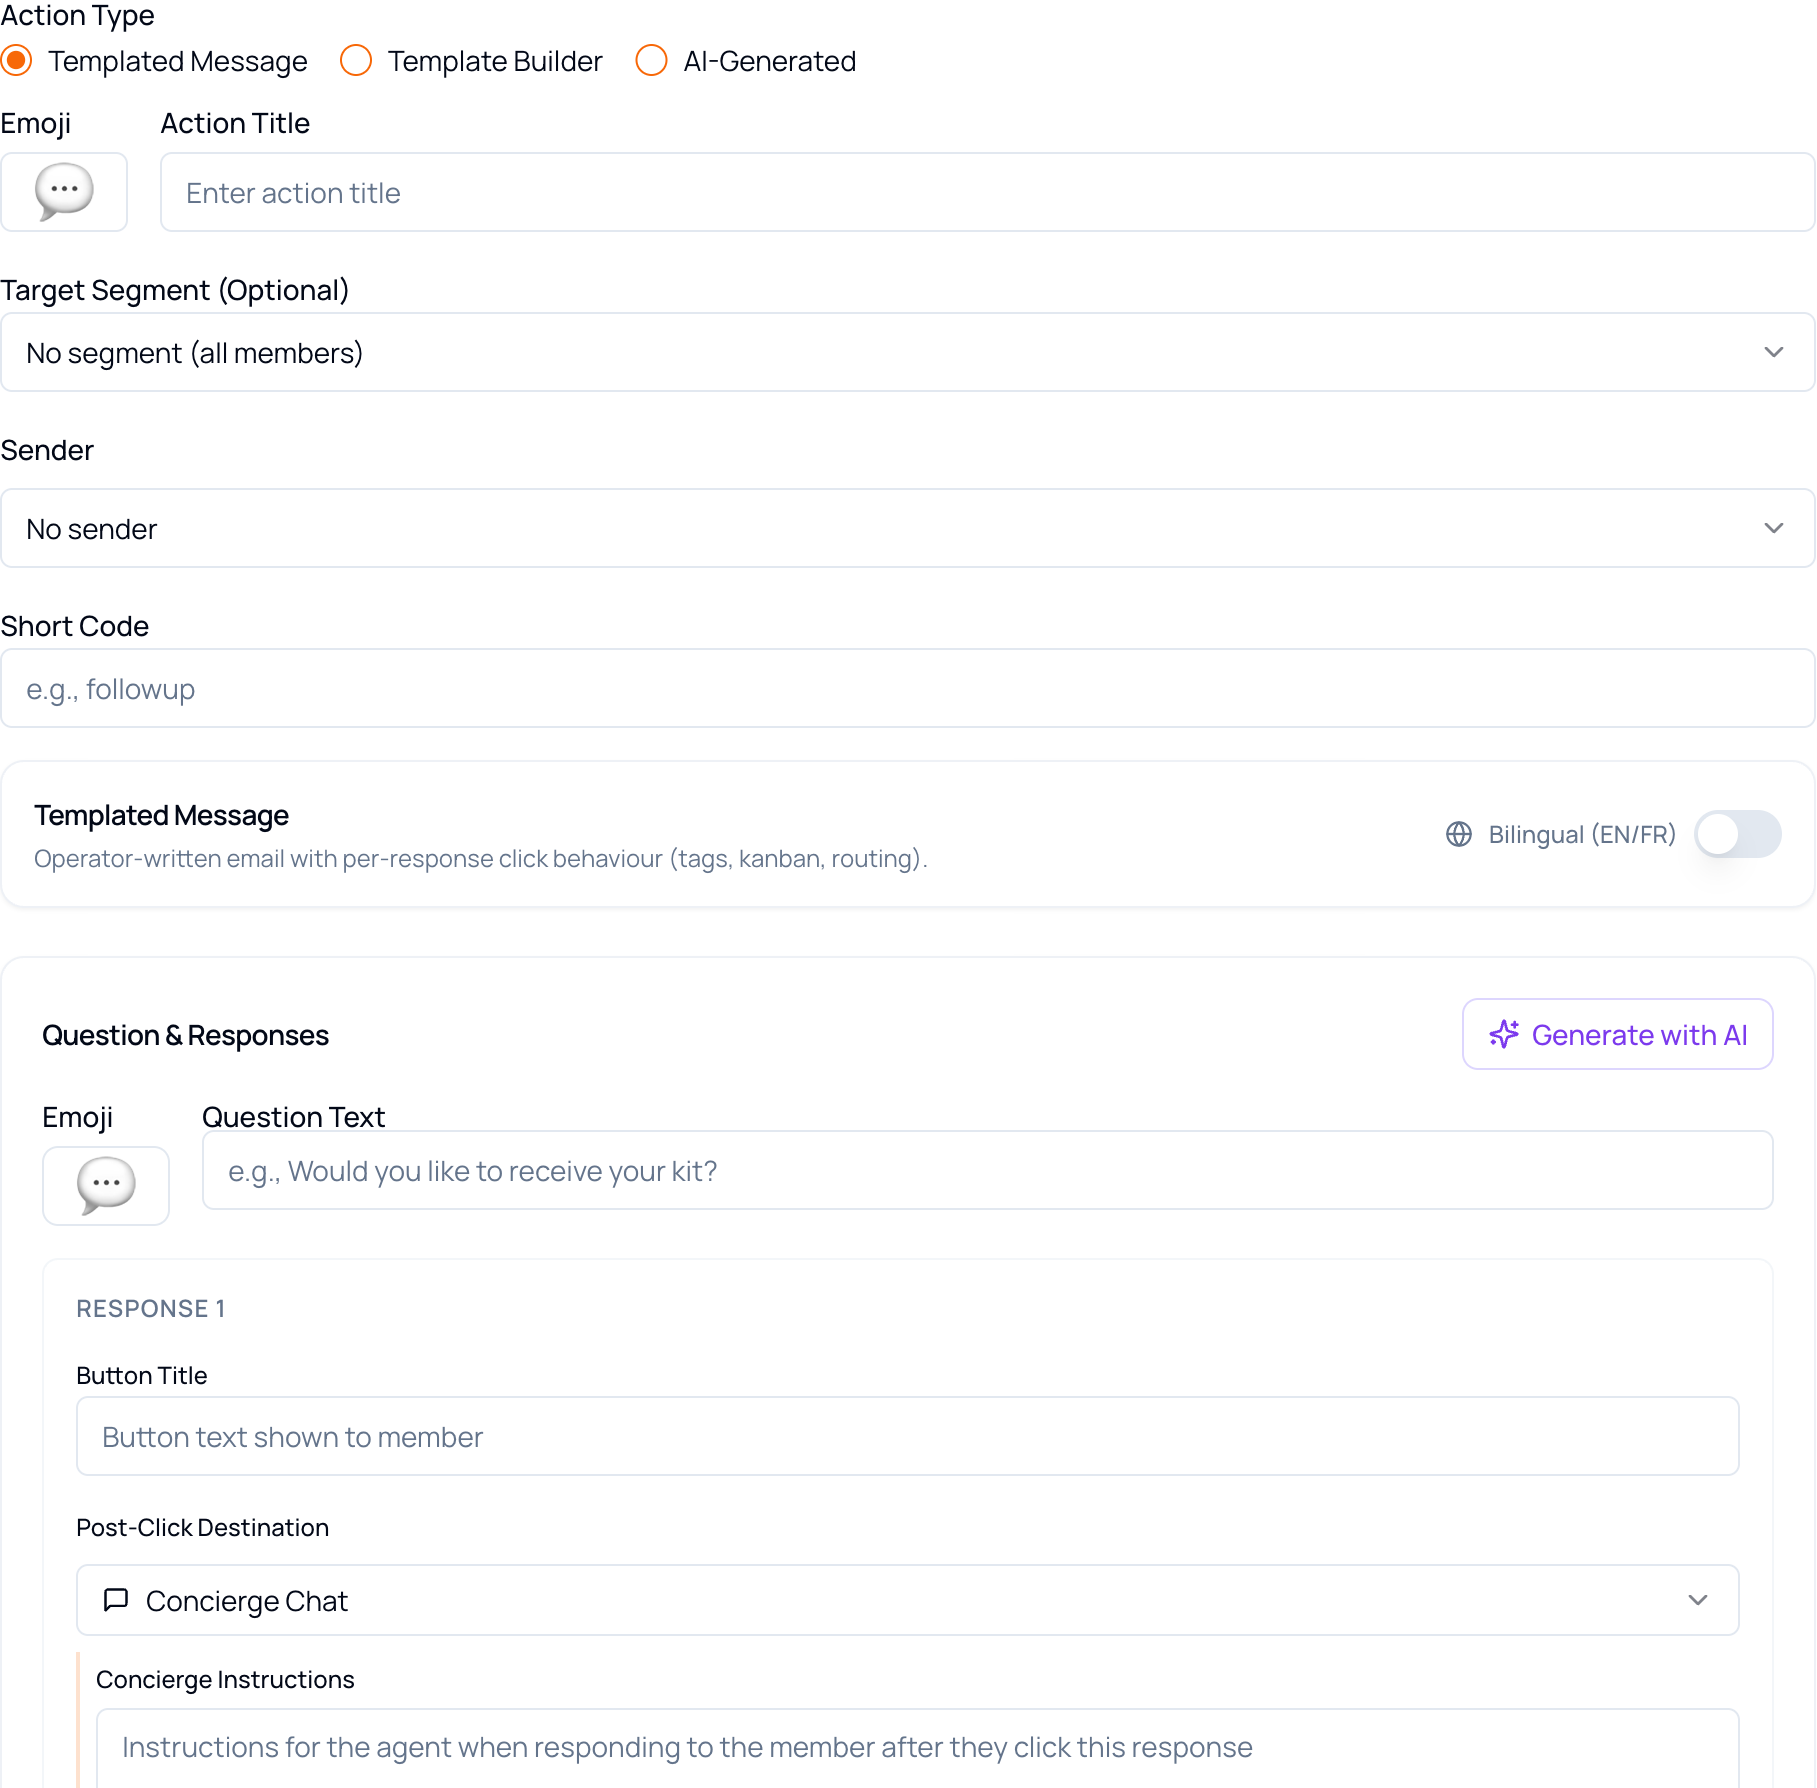
| Field | What to enter |
|---|---|
| Emoji & Action Title | A name for this outreach. Both appear wherever the action is listed. |
| Target Segment | Who receives it. Optional — leaving it as No segment (all members) targets your entire membership. |
| Sender | The person the email comes from. Their name and address appear in the From line. |
| Short Code | A short identifier for this action, e.g. volunteer-interest. |
| Bilingual (EN/FR) | Produces the message in English and French. Off by default. |
The Question and Its Responses
Section titled “The Question and Its Responses”One question, and a button for each way a member might answer.
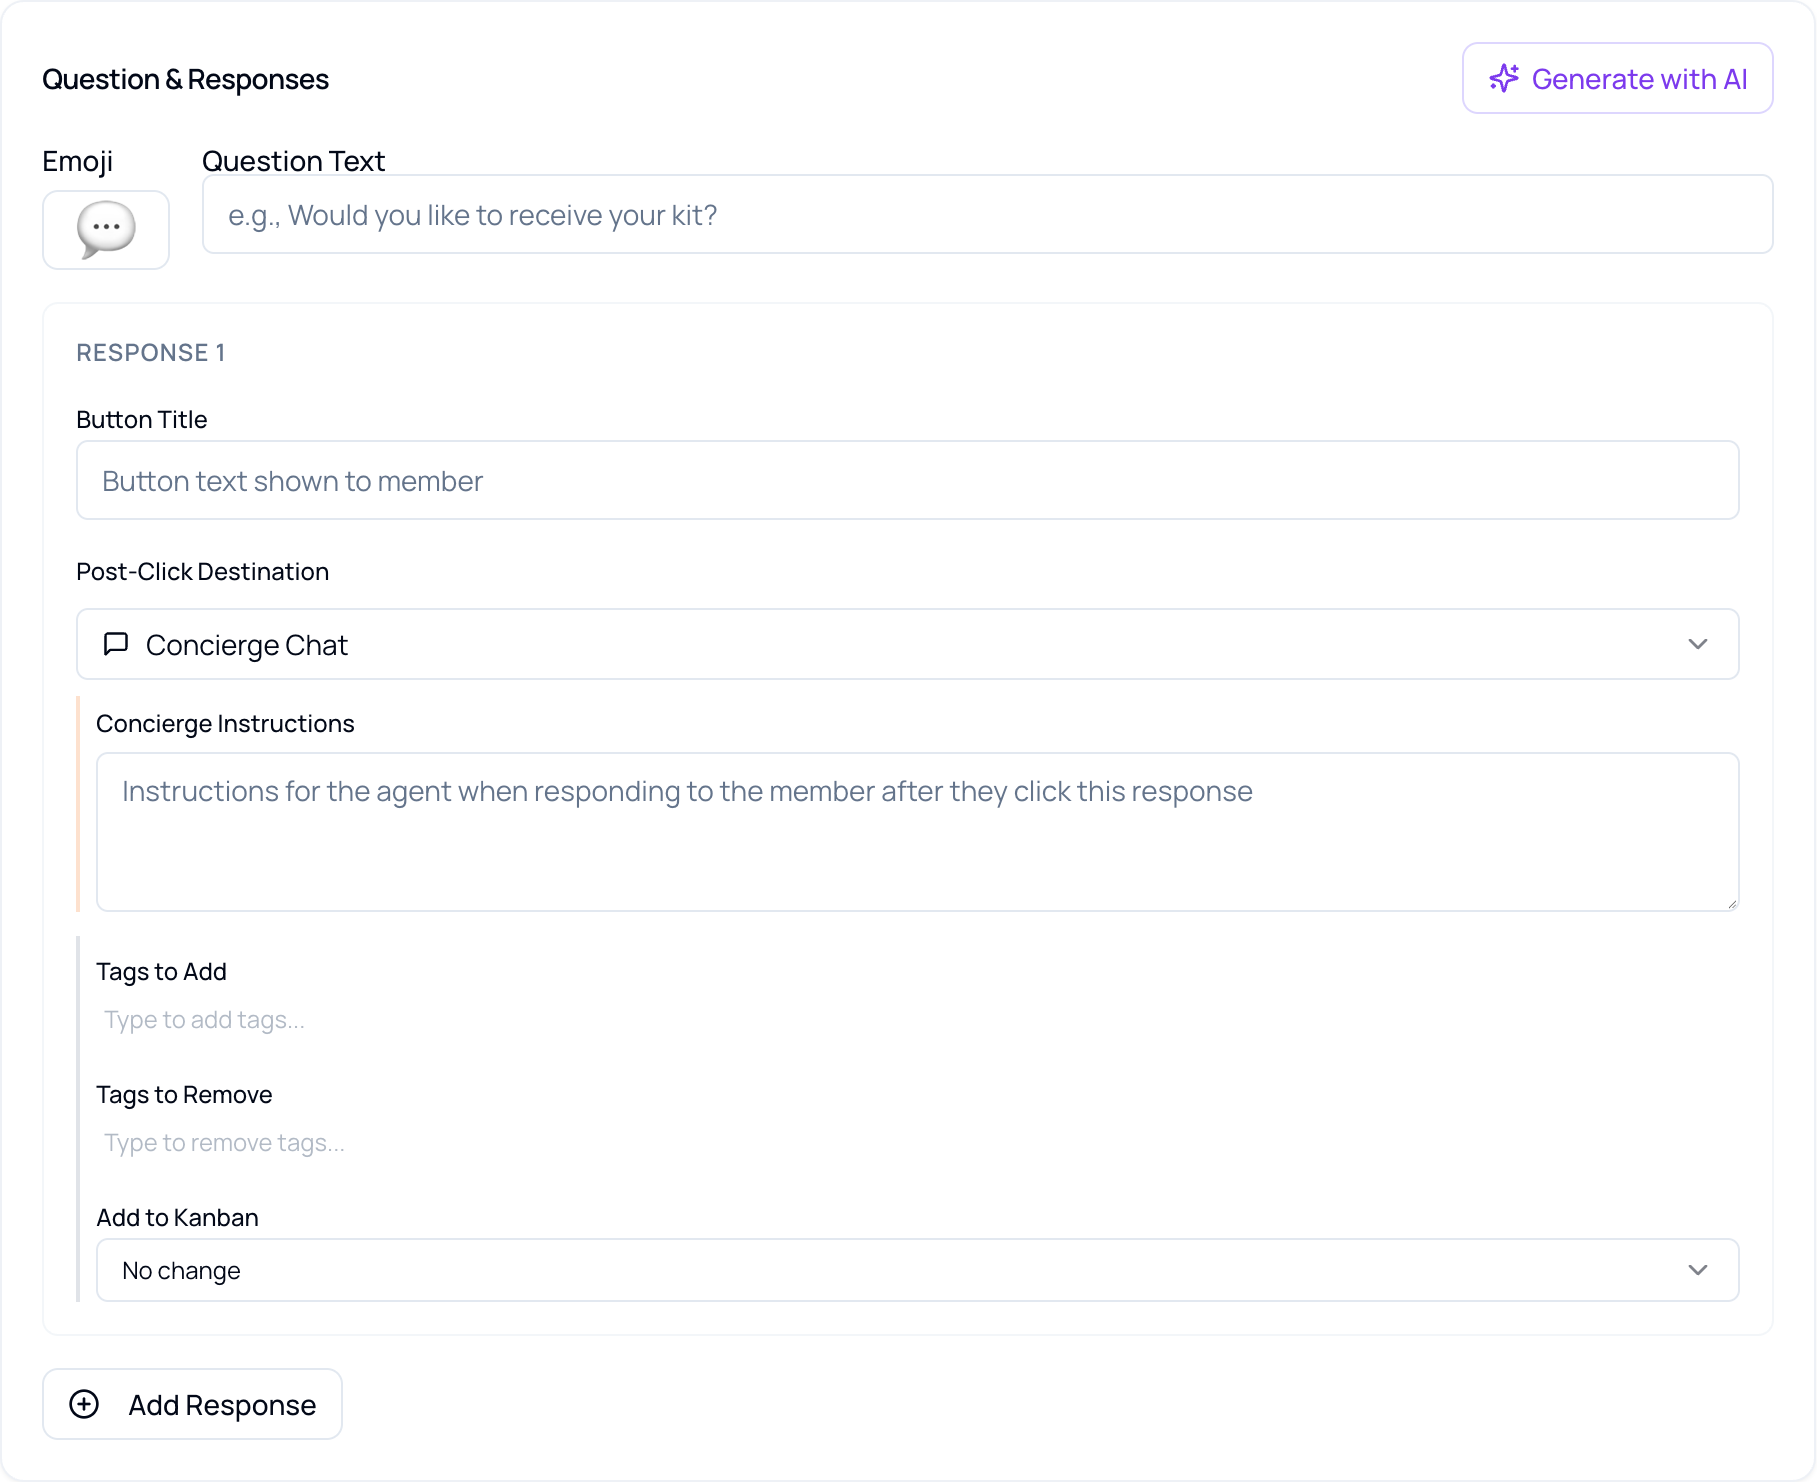
Write the question in Question Text — keep it answerable in a single click. Then configure each response. Click Add Response for as many buttons as you need.
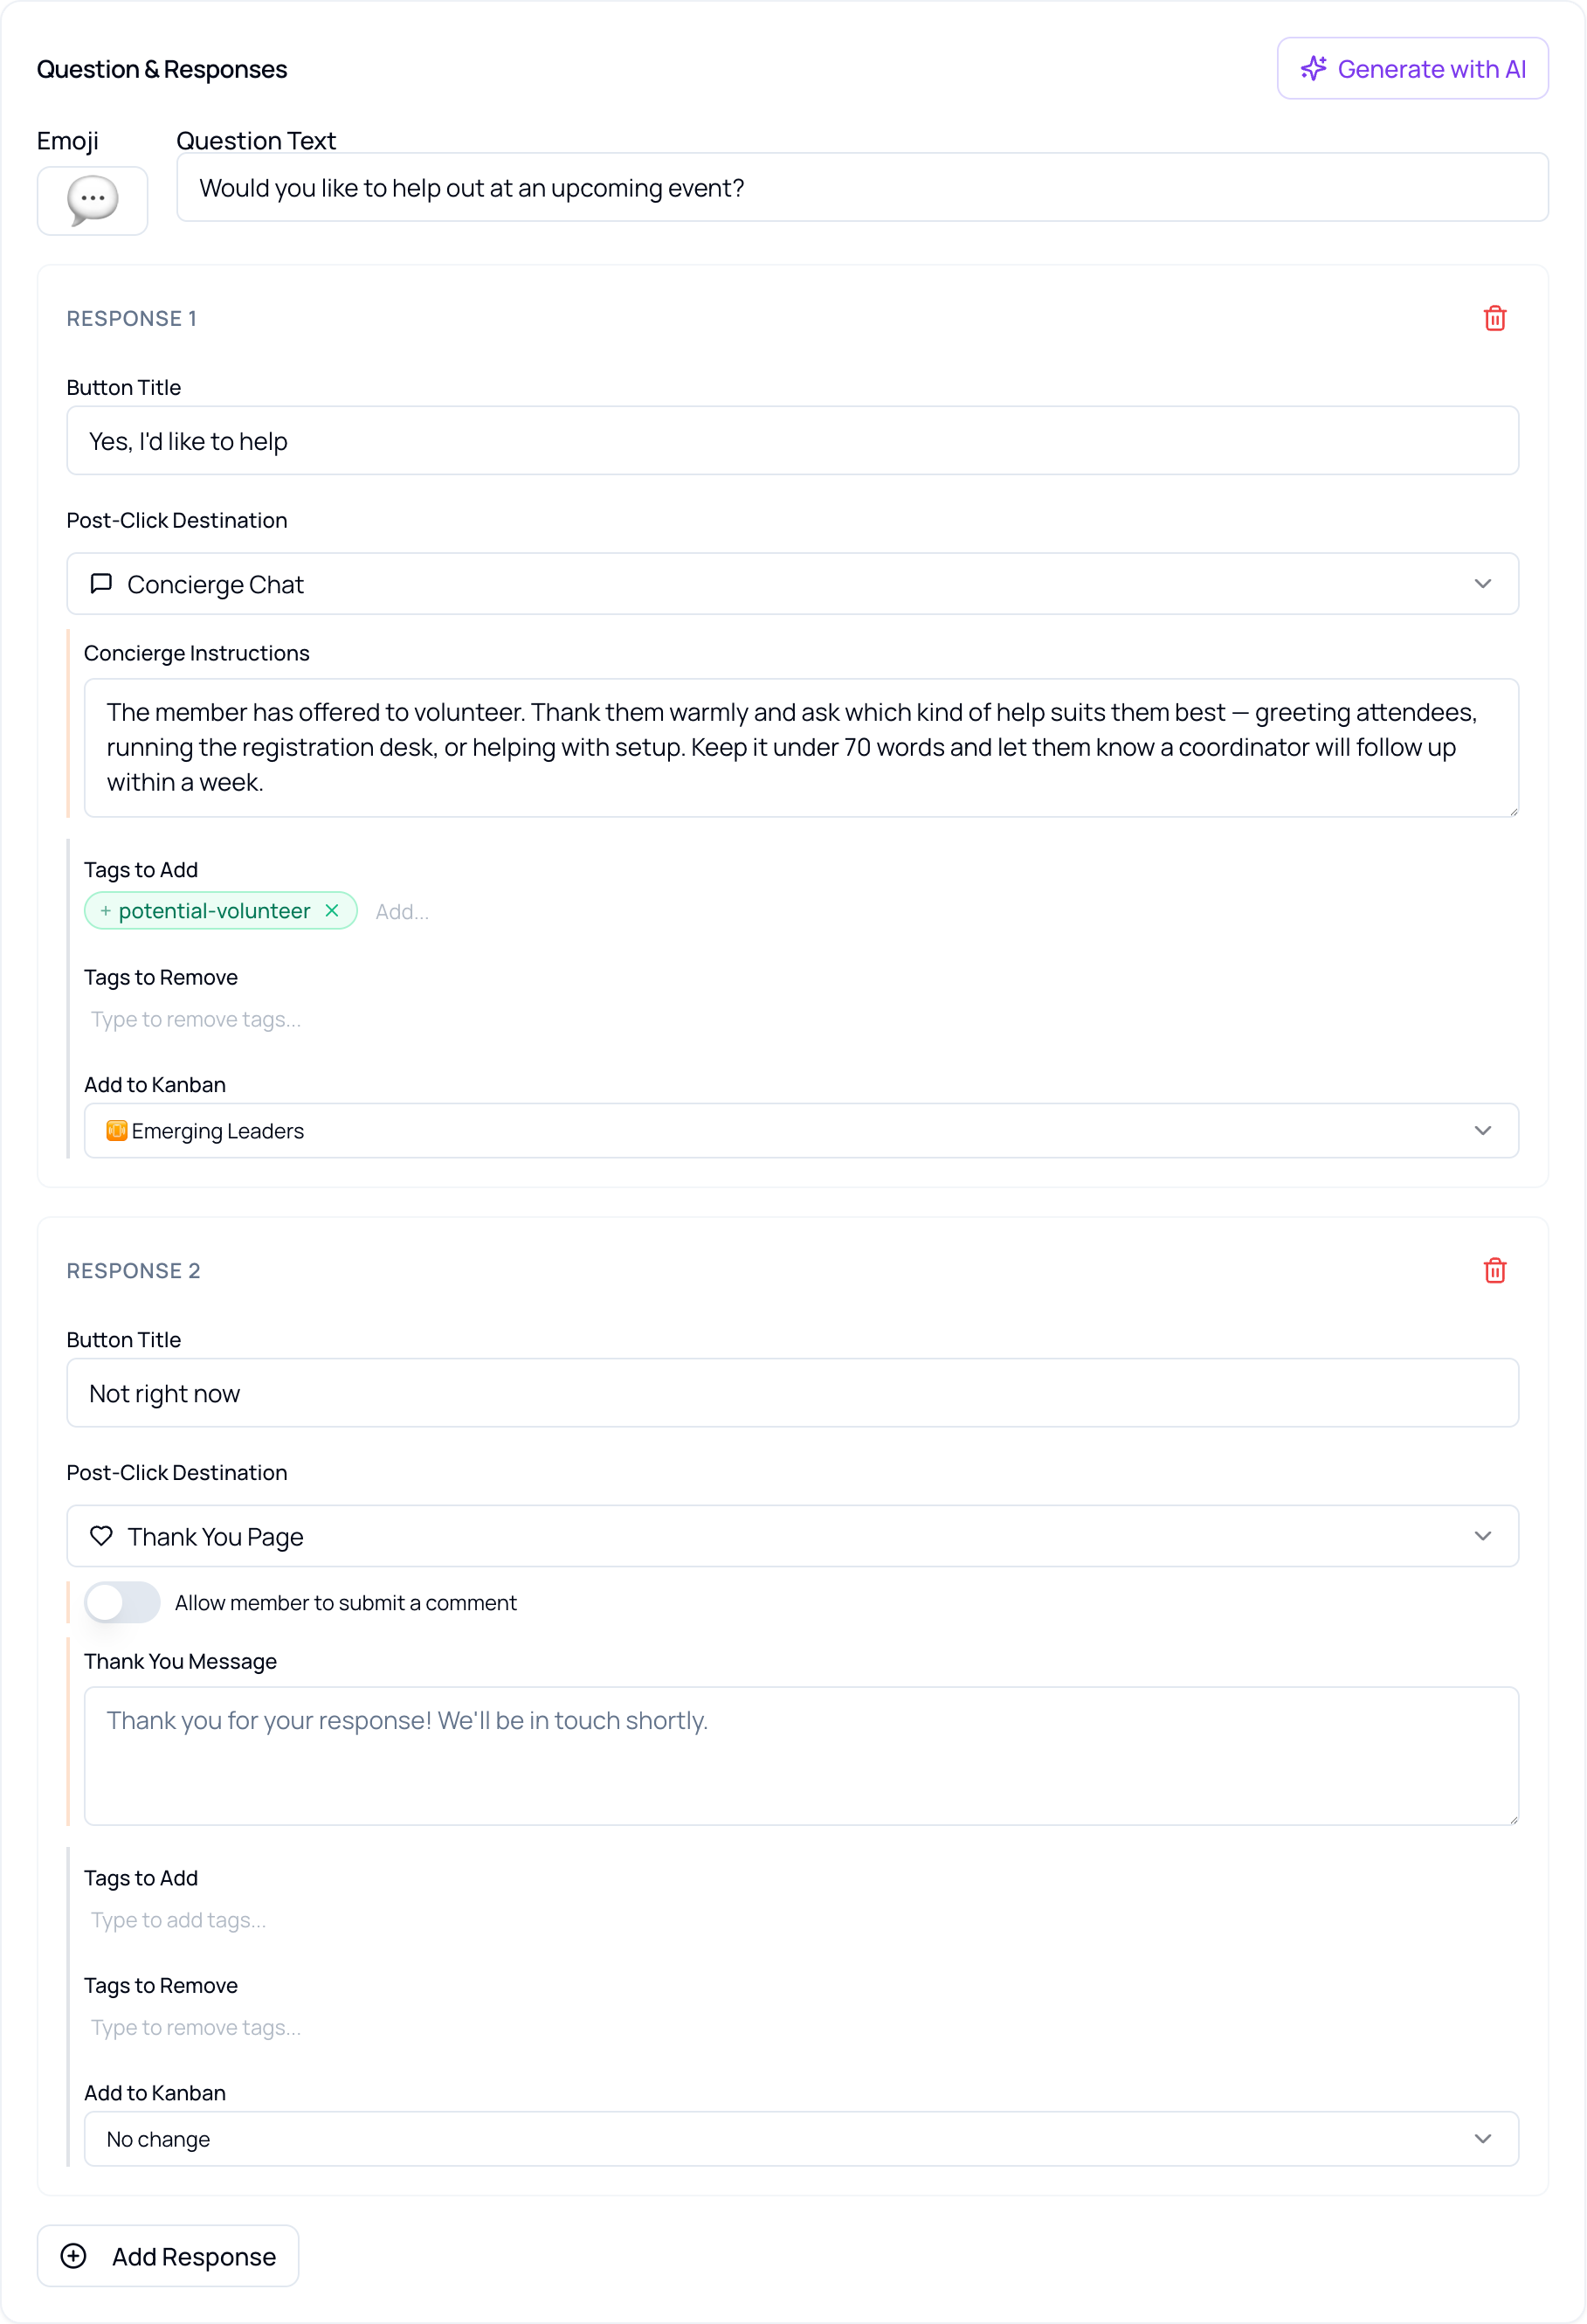
| Per-response setting | What it does |
|---|---|
| Button Title | The text on the button the member clicks. |
| Post-Click Destination | Where the member lands after clicking — see the next section. |
| Tags to Add | Tags applied to the member’s profile on click. Type the tag and press Enter to attach it. |
| Tags to Remove | Tags stripped from the profile on click. |
| Add to Kanban | The Engagement Board column the member moves to. Leave as No change if no follow-up is needed. |
Post-Click Destinations
Section titled “Post-Click Destinations”Five options, set per response.
| Destination | What the member gets | Good for |
|---|---|---|
| Concierge Chat | A conversation with the AI Concierge, guided by instructions you write for that response. | Follow-ups that should feel personal and can continue. |
| AI-Driven Form | A form generated from your description of the fields you want. | Collecting structured information — profile updates, feedback. |
| Thank You Page | A short acknowledgement and nothing further. | Answers that need recording but no follow-up. |
| Custom Form URL | Redirects to a form you already have elsewhere. | Existing registration or survey forms. |
| Custom URL | Redirects to any web address. | Payment portals, resources, event pages. |
Destinations can be mixed within one question. A “Yes” might open a Concierge Chat while a “Not right now” shows a Thank You Page — and both can still apply their own tags and board routing.
Writing Concierge Instructions
Section titled “Writing Concierge Instructions”When a response routes to Concierge Chat, its Concierge Instructions tell the AI how to reply to the member who clicked that button. Four things to cover:
- State the purpose — the member wants to renew, needs more time, is not interested.
- Set the style — tone, length, values. For example: warm, supportive, under 70 words.
- Describe the message — what to acknowledge, encourage, or invite.
- Include a light next step — a renewal link, a resource, or an offer to answer questions.
For example: “You are responding to a member who clicked ‘I meant to renew — just haven’t yet.’ Acknowledge that life gets busy and this is completely understandable. Gently encourage them to complete their renewal. Keep the tone warm and supportive, under 70 words. Use the member’s first name.”
Writing the Email
Section titled “Writing the Email”Three fields: subject, body, closing.
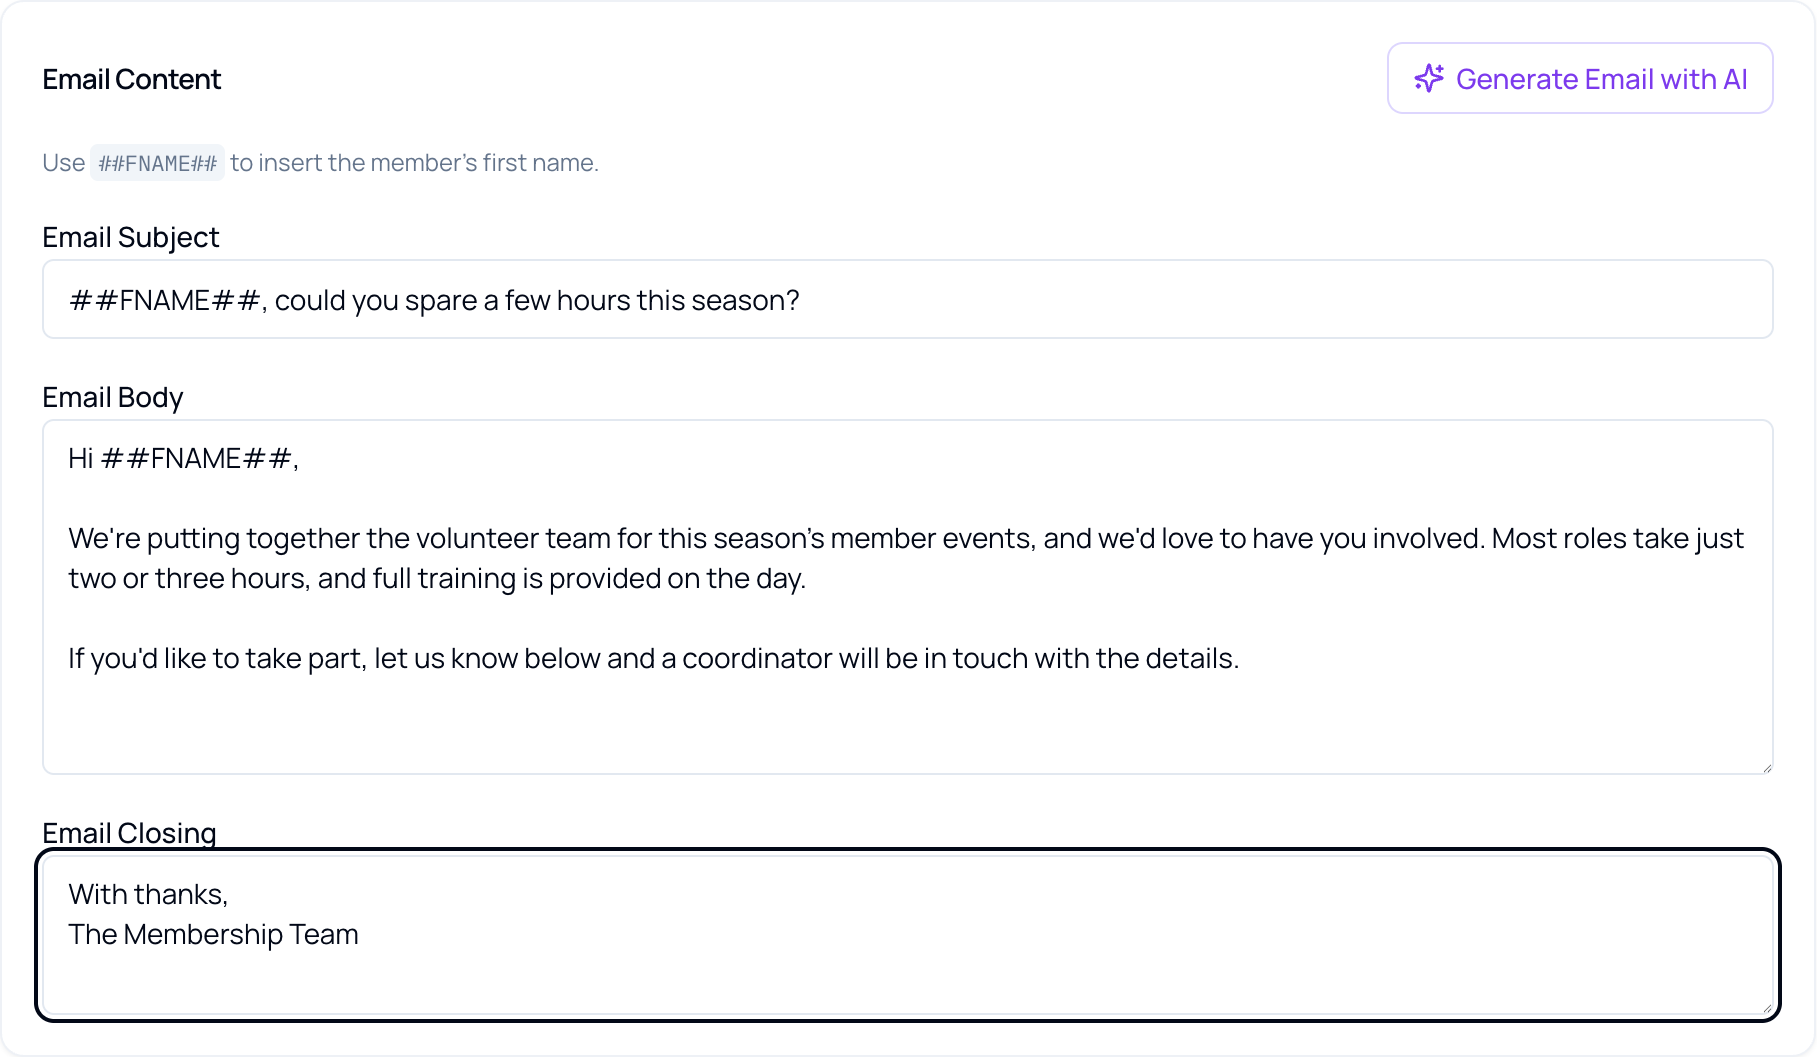
Use ##FNAME## anywhere in the subject or body to insert the member’s first name. It is replaced individually for every recipient.
AI-Generated Actions
Section titled “AI-Generated Actions”A different shape of form: you write instructions, not an email.
Choosing AI-Generated replaces the question builder and the email fields with a Action Sub-Type and three instruction boxes. Engage composes each member’s message individually, using their profile as context — so no two are identical.
| Field | What it controls |
|---|---|
| Action Sub-Type | Concierge routes clicks into a conversation; Form routes them into a generated form. |
| Email & Question Instructions | What the email should say and what to ask. This is the main instruction. |
| Action Instructions (optional) | What should happen when the member clicks. |
| Concierge Instructions (optional) | How the Concierge should behave in the conversation that follows. |
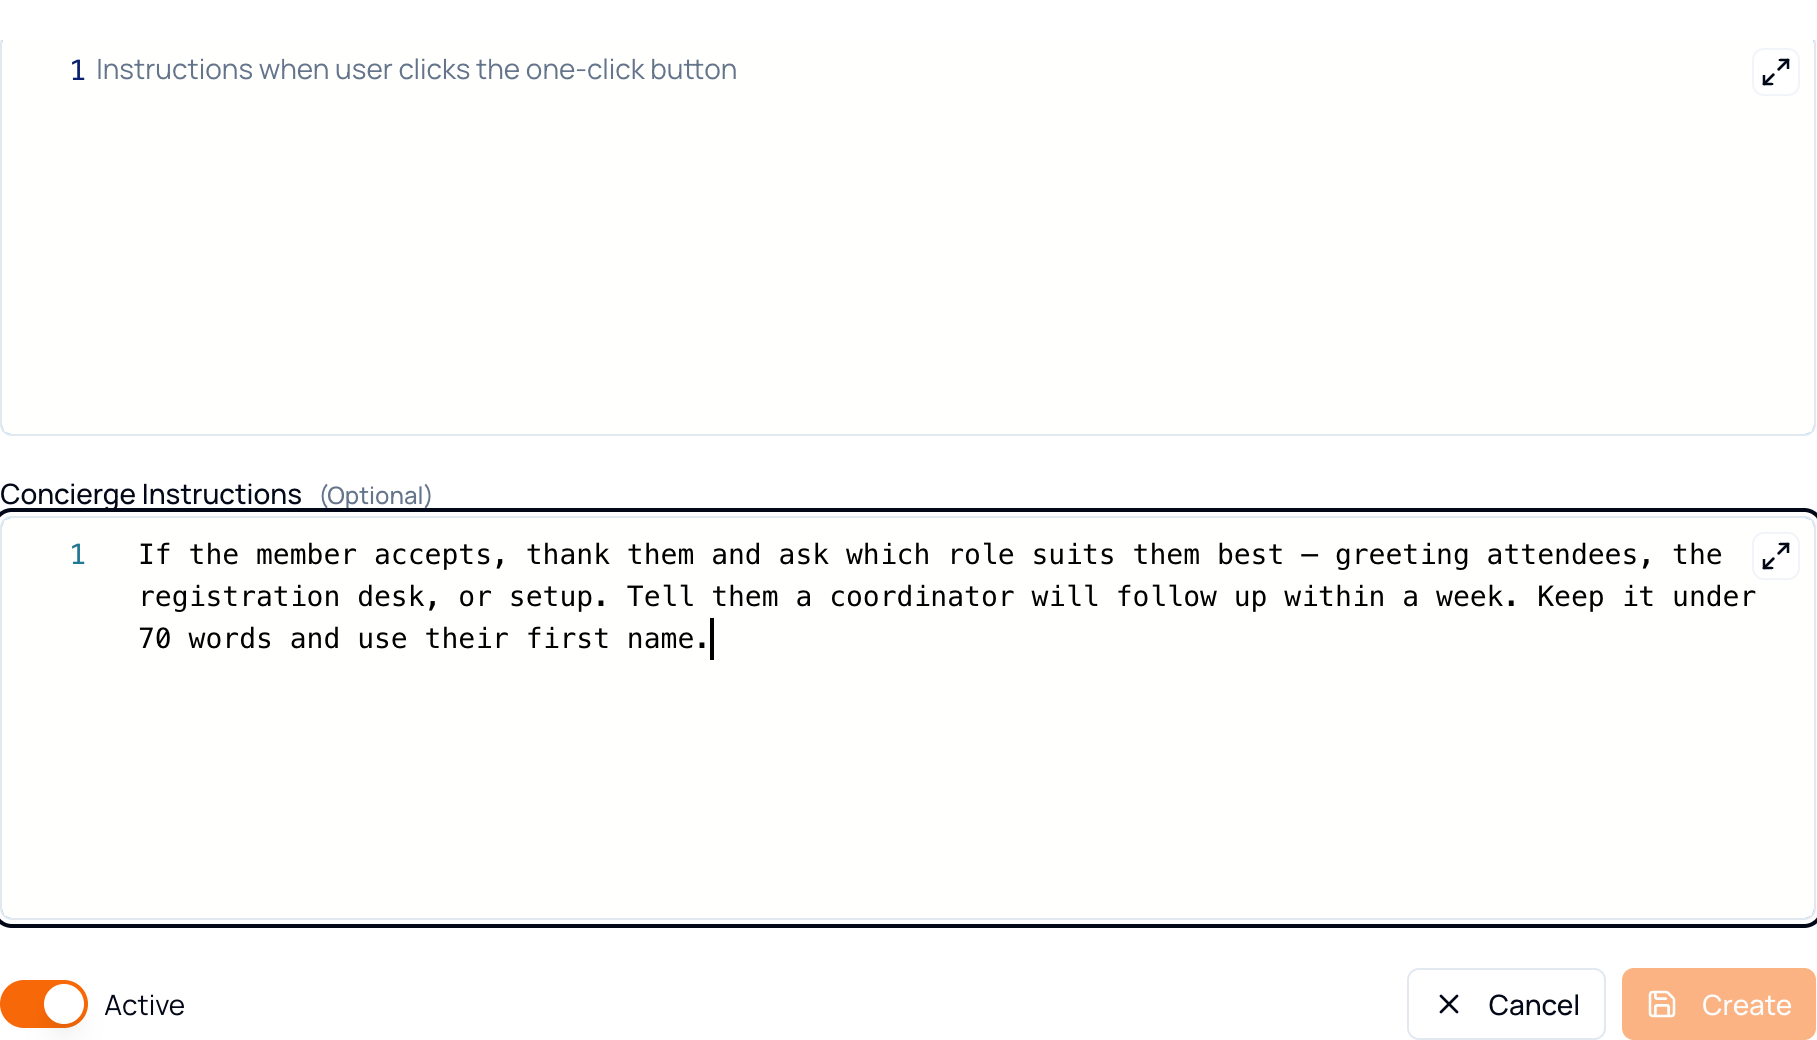
Working through that in order:
- State the goal of the email — drive renewals, gather feedback, promote an event.
- Give guidance on length — under 60 words, around 100 words, or longer.
- Set the tone — friendly, supportive, professional, inspiring.
- Add key context — a member’s past-due status, an upcoming event, recent activity.
- Include any special notes — language preferences, restrictions, or a point to emphasize.
Instructions are never seen by the member, and can be written in any language.
Template Builder
Section titled “Template Builder”A visual designer for the email body.
Template Builder keeps everything else the same — segment, sender, short code, subject — but replaces the plain-text body with a drag-and-drop canvas, described in the app as “Visual email designer — drag-and-drop blocks. Full control over the email body.”
Choosing Template Builder offers a starting point first: one of four prebuilt templates, or Start blank for the empty canvas.
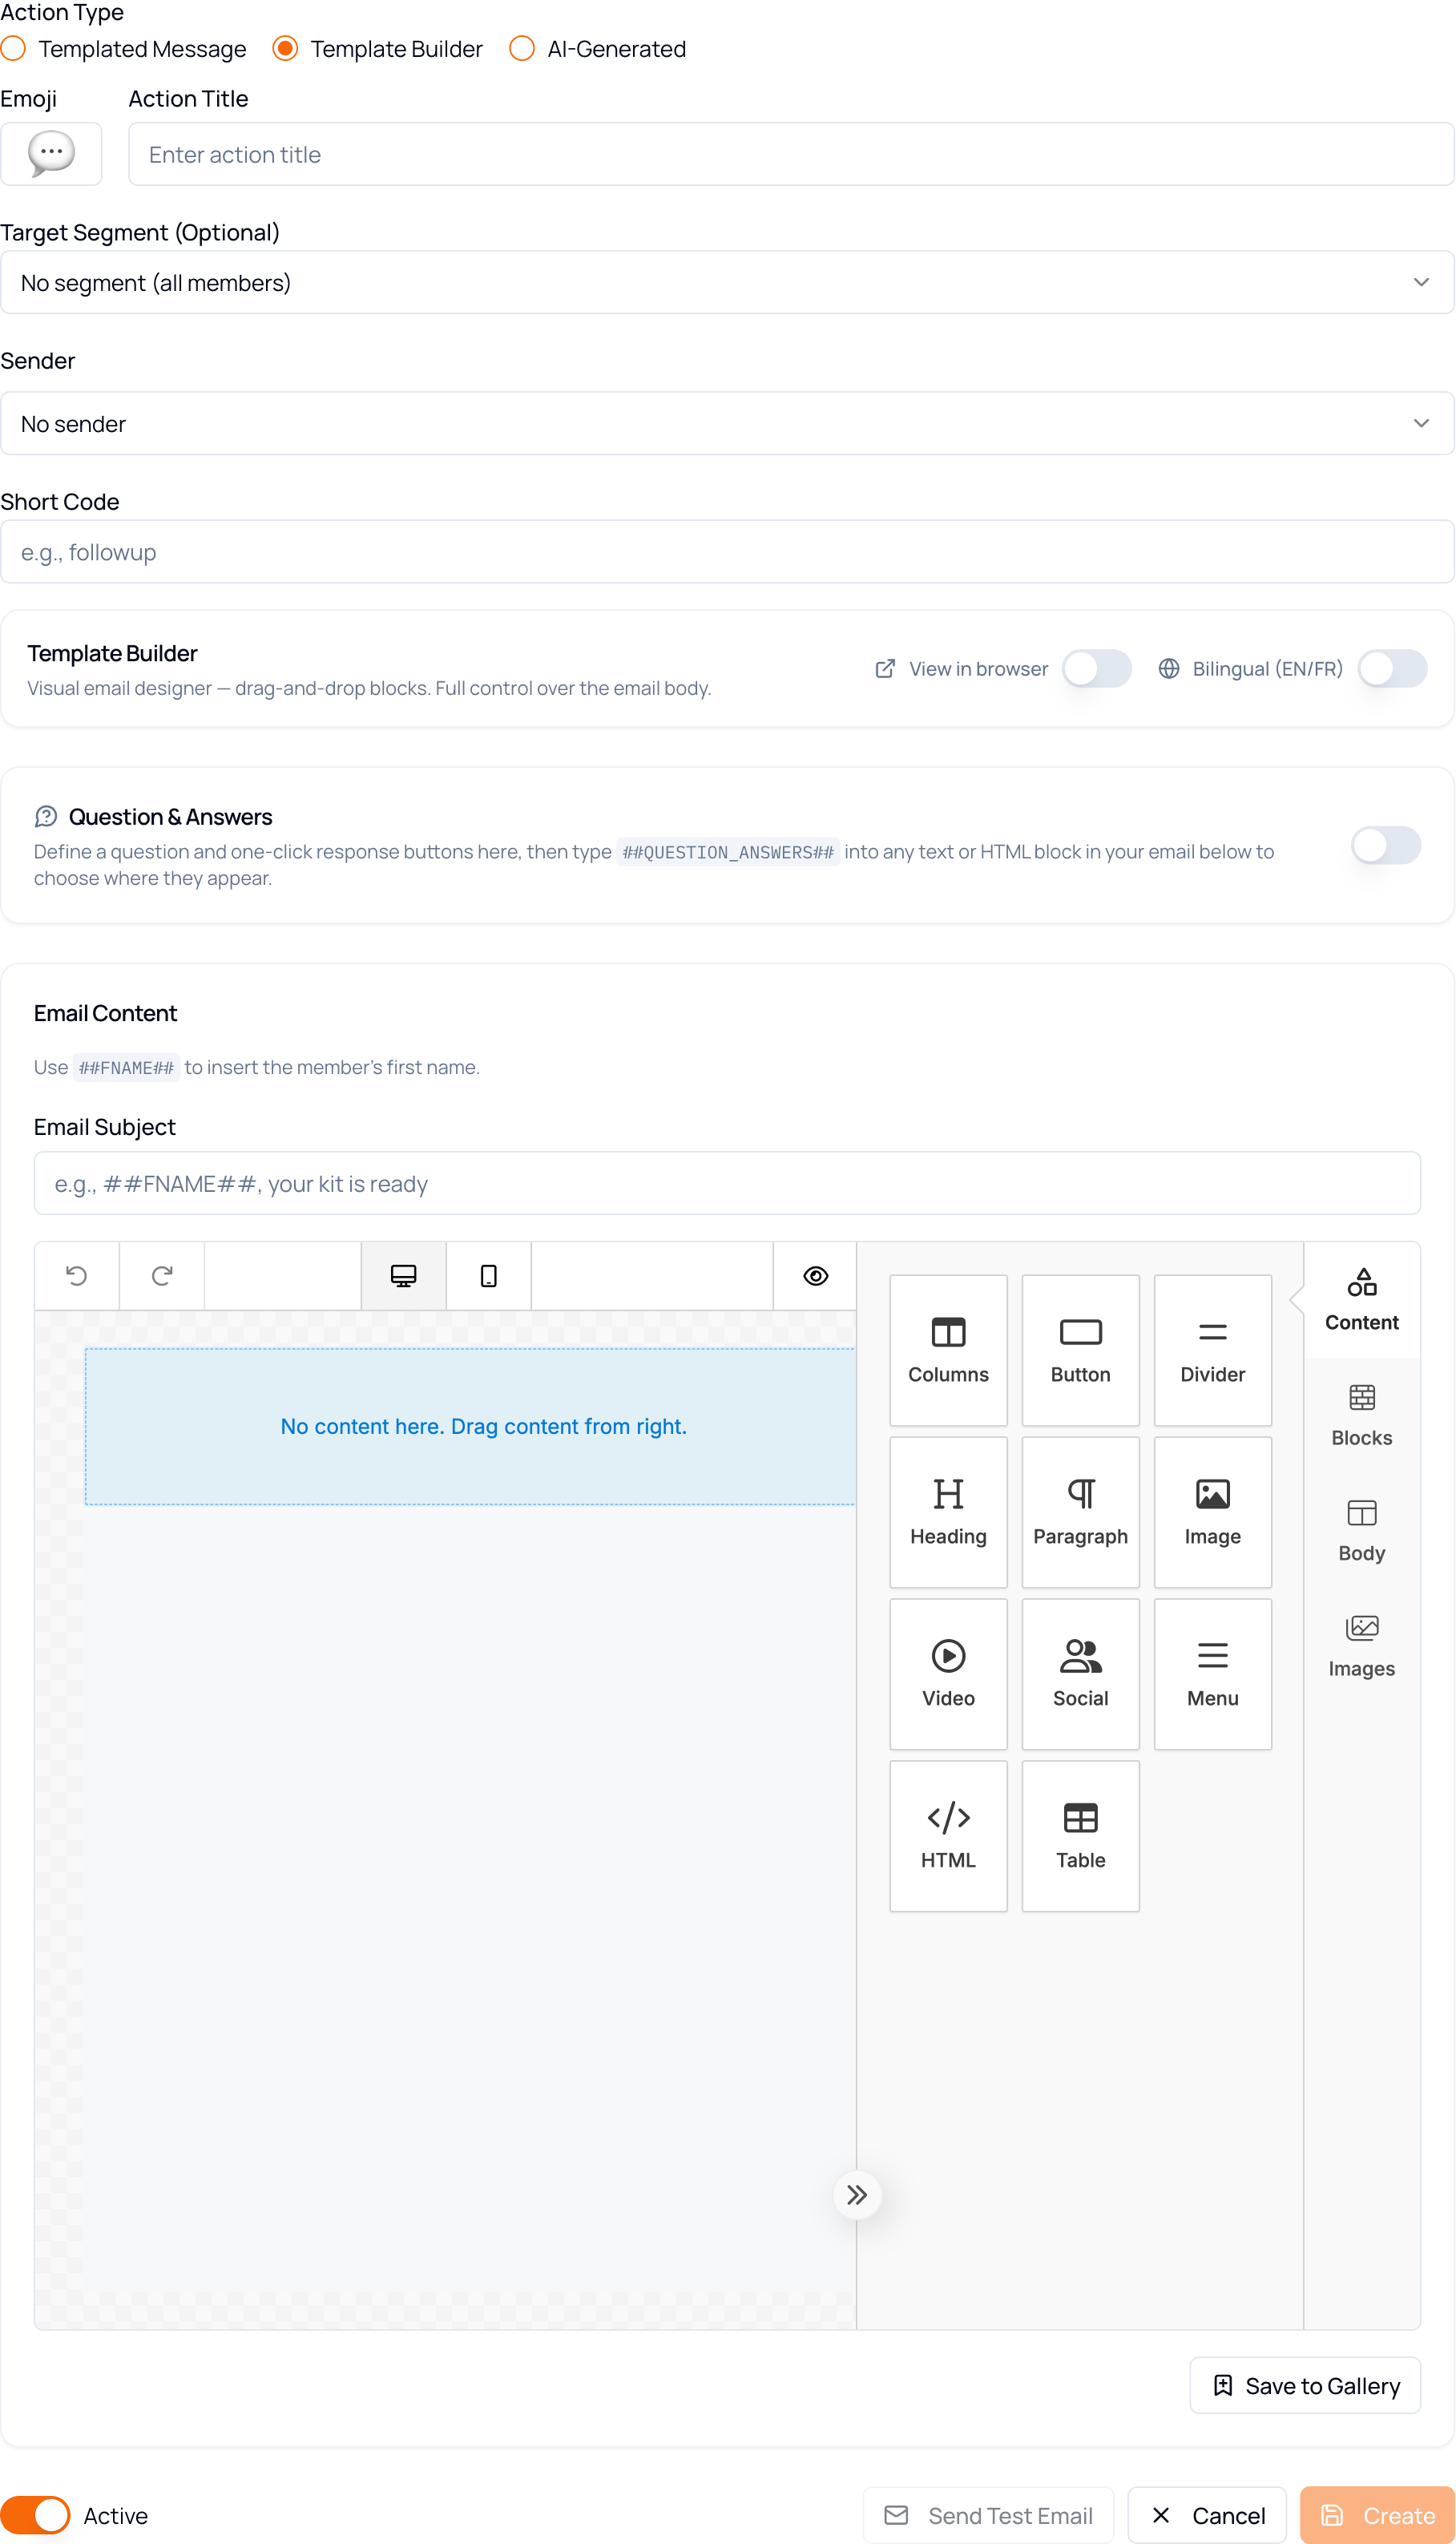
Eleven block types are available — Columns, Button, Divider, Heading, Paragraph, Image, Video, Social, Menu, HTML and Table — and three controls have no equivalent on a Templated Message action:
| Control | What it does |
|---|---|
| Question & Answers | Define the question and its response buttons here, then type ##QUESTION_ANSWERS## into any text or HTML block to choose where they appear in the email. |
| View in browser | Adds a “view this in your browser” link to the email. |
| Save to Gallery | Saves the current design as a reusable template. |
Previewing Before You Run
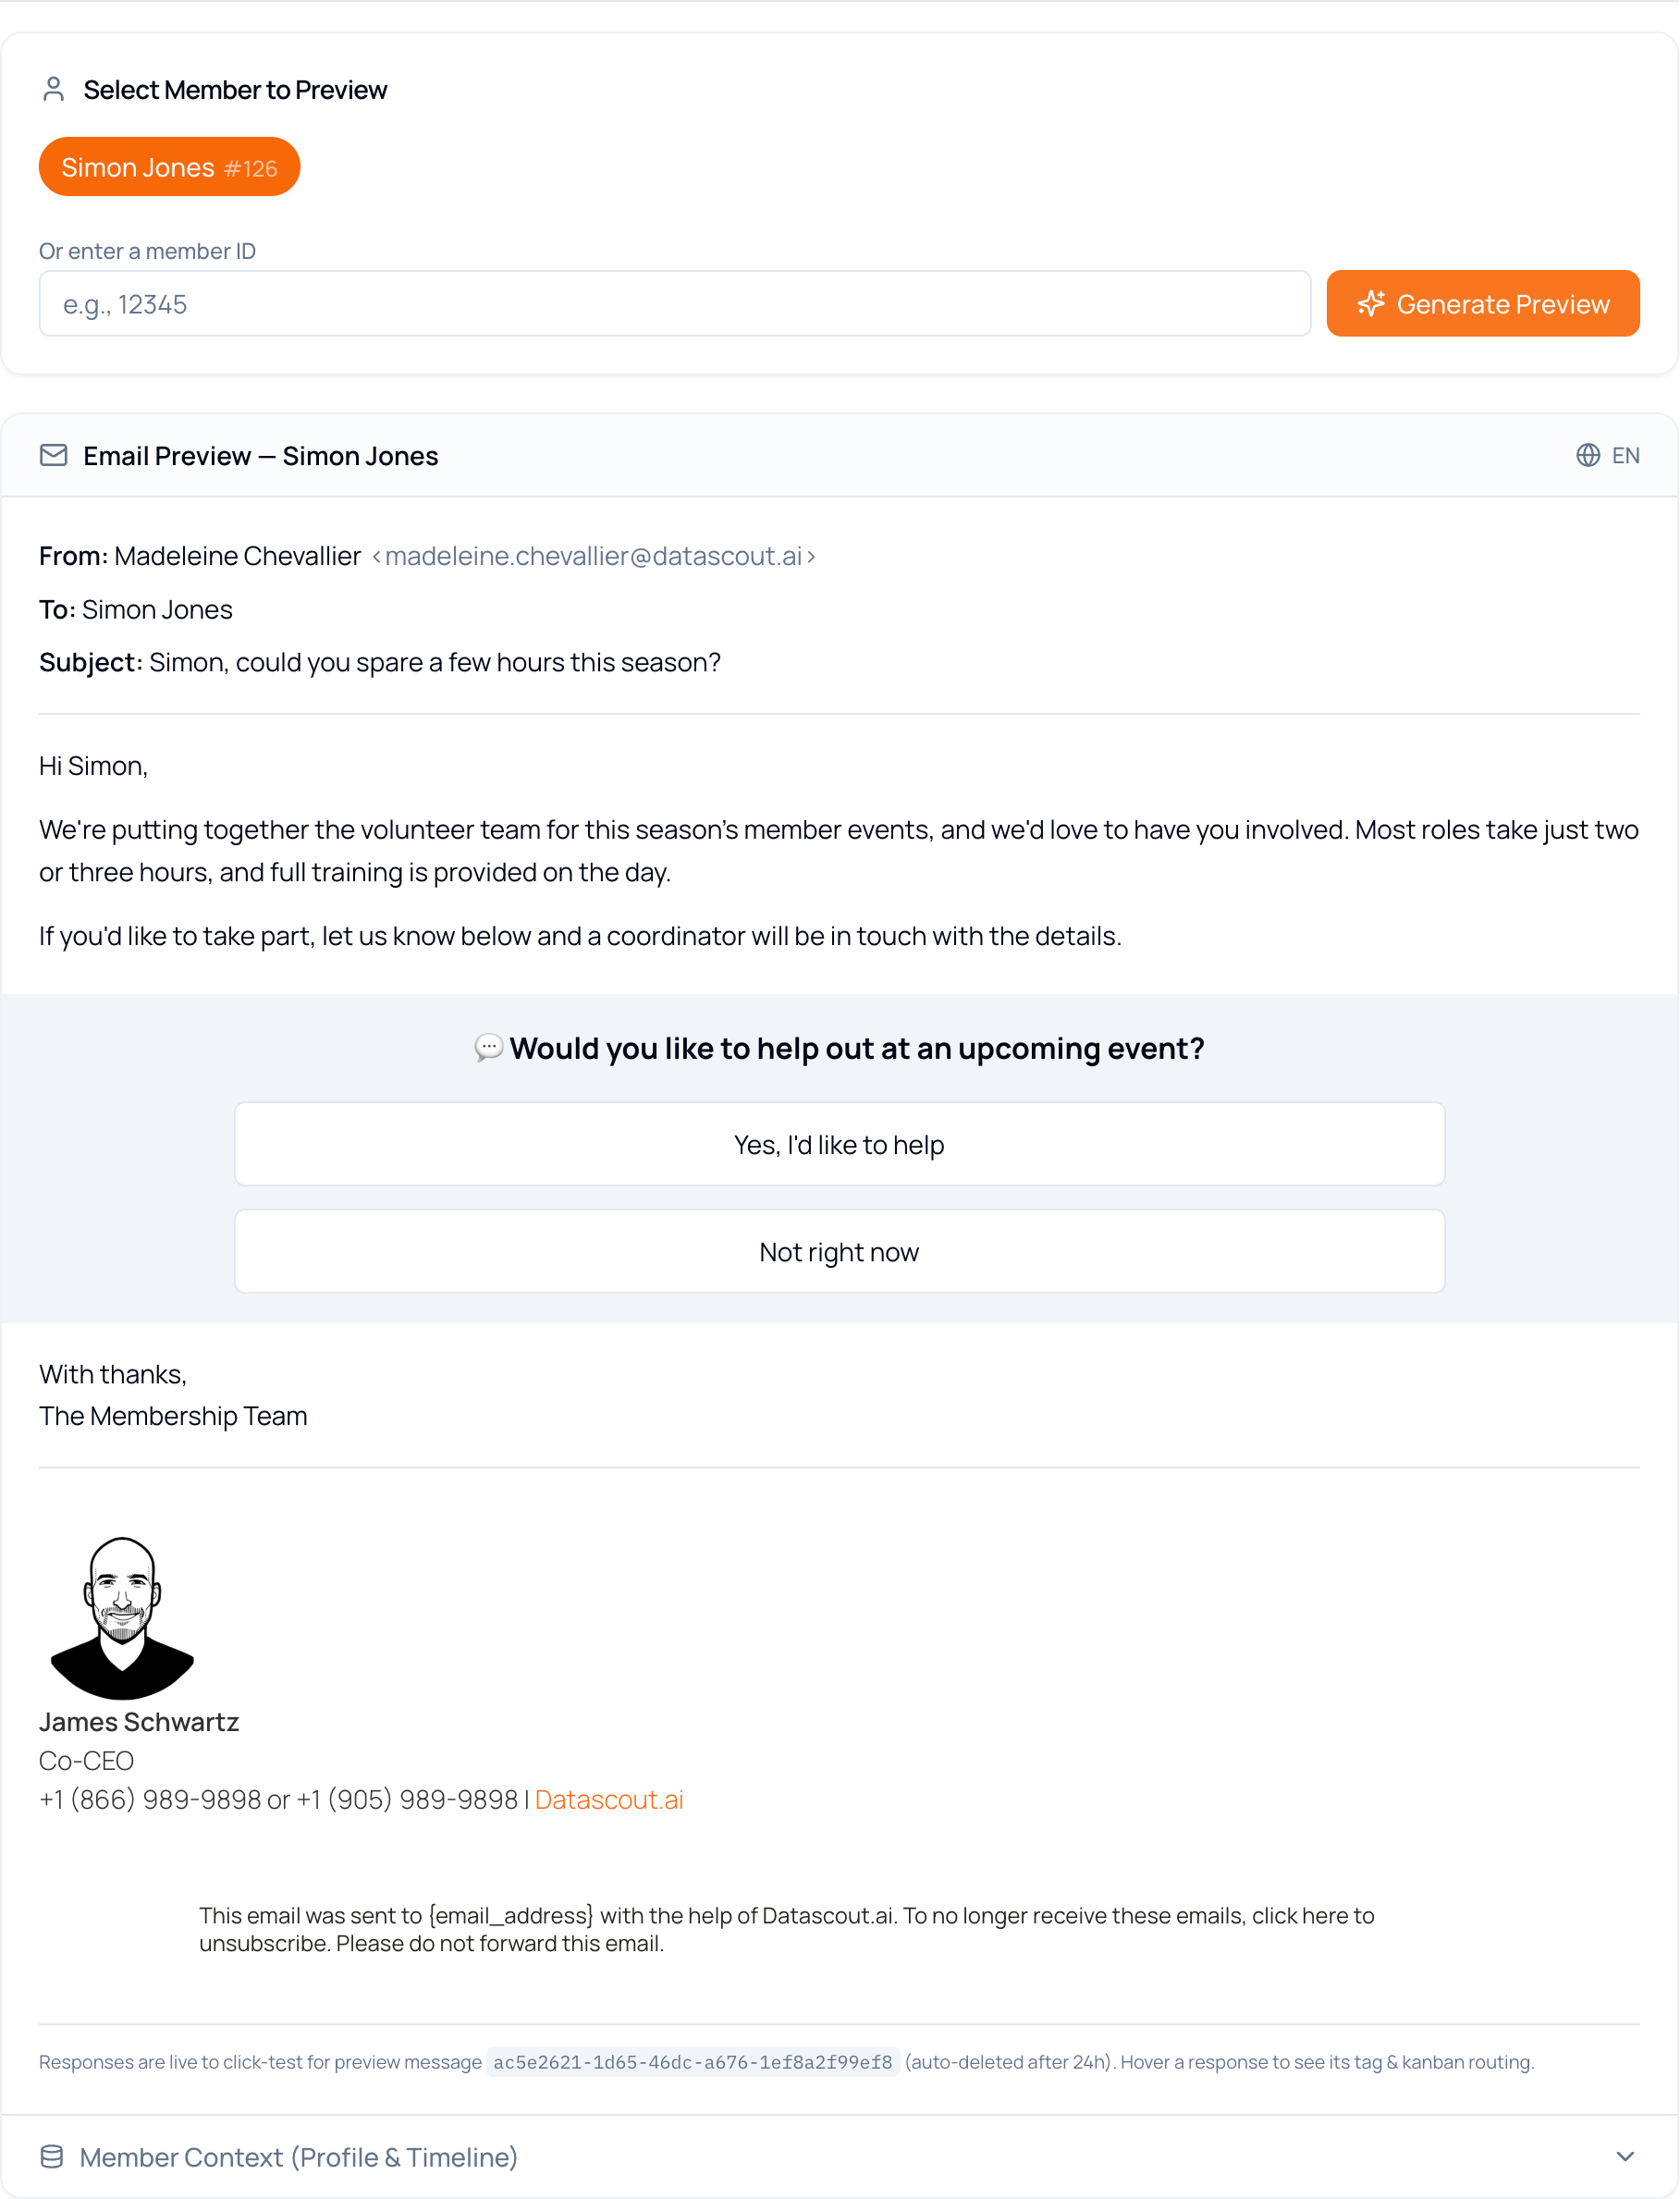
Section titled “Previewing Before You Run”The most useful button on the page. Use it every time.
Preview on an action lets you pick a member — or type a member ID — and see the finished email exactly as that person will receive it, with merge tags resolved and the response buttons in place.
Running an Action
Section titled “Running an Action”This generates the messages. It does not send them.
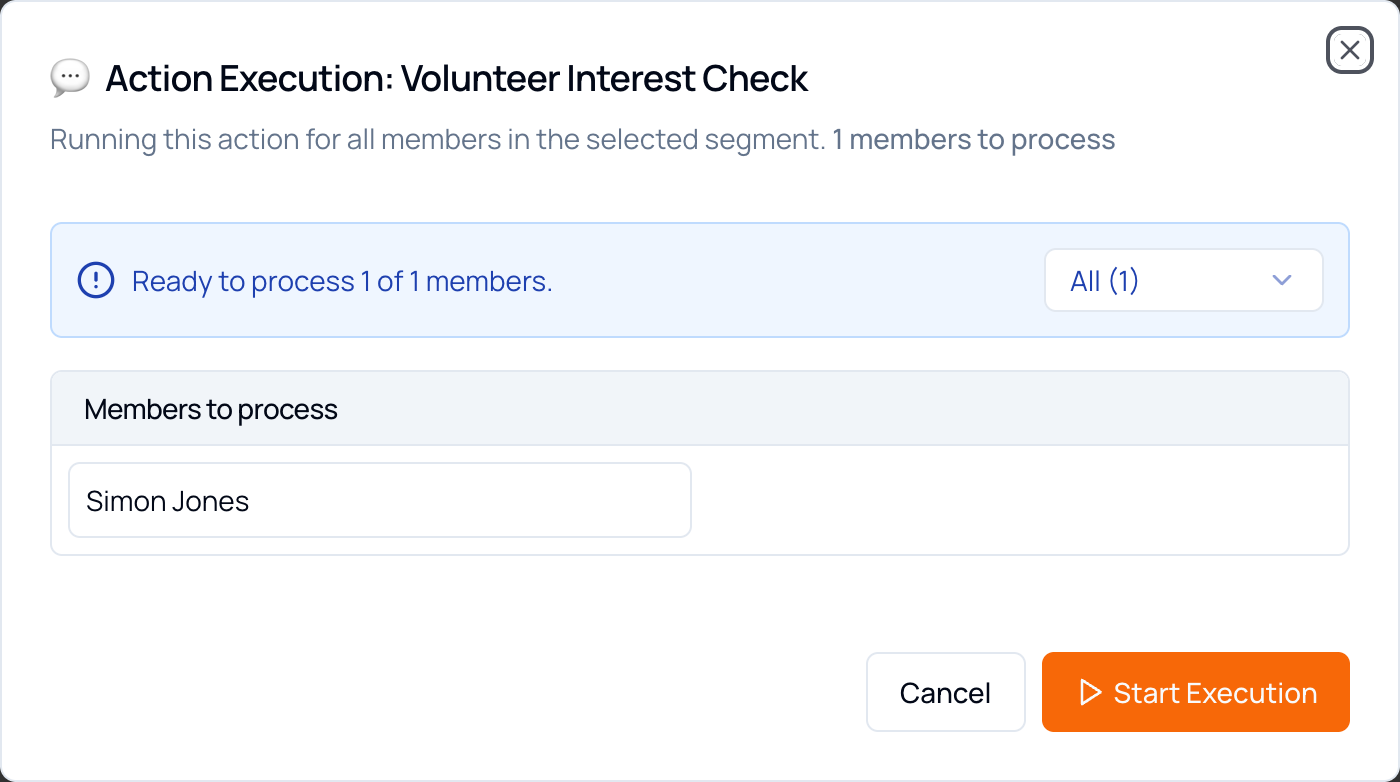
- Click Run Action on the action.
- Check the count in the Action Execution window — it tells you exactly how many members will be processed, and lists them.
- Click Start Execution.
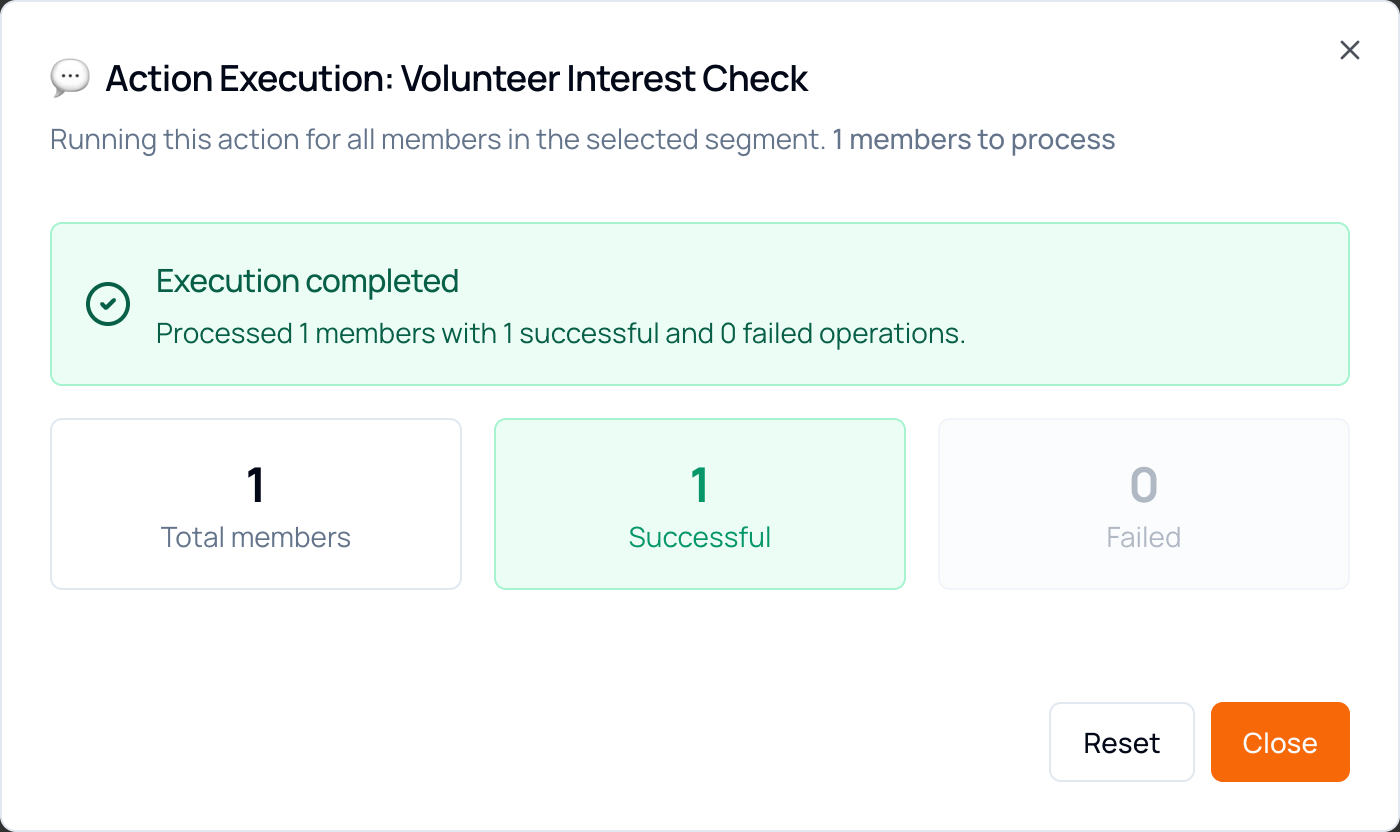
- Wait for the summary: total processed, successful, failed.
The generated messages now wait in Messages → Requires Approval:
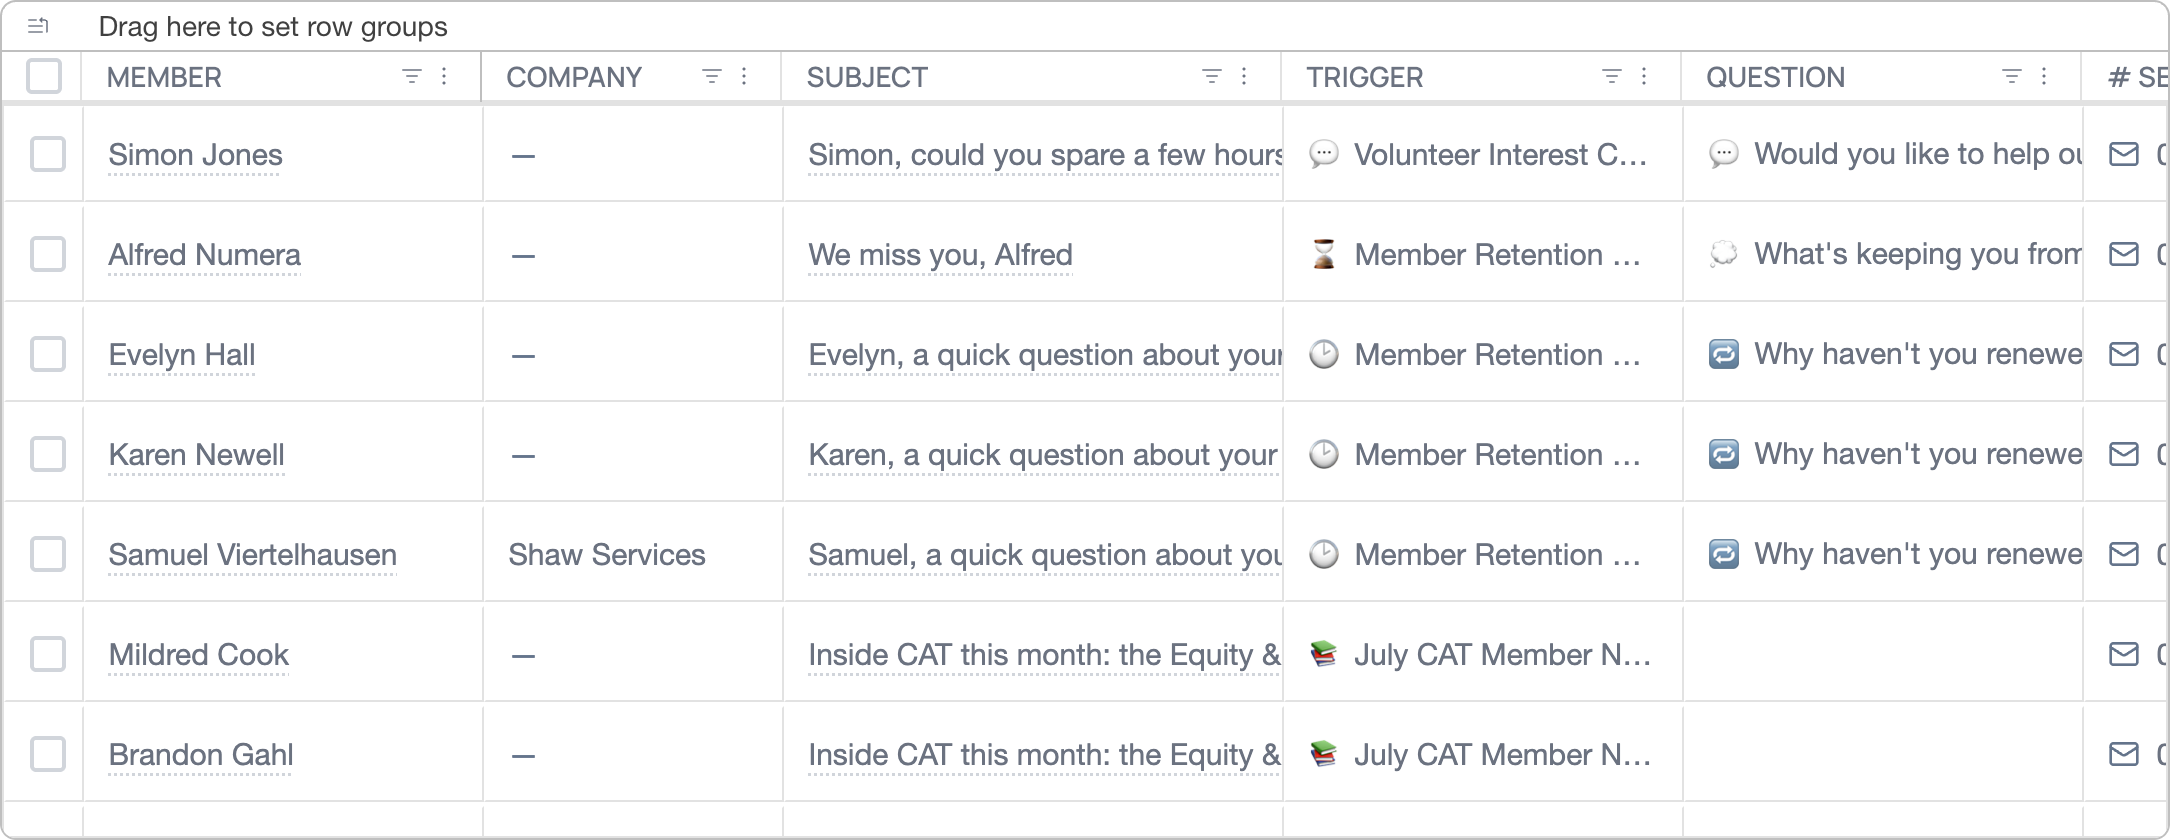
Managing Actions
Section titled “Managing Actions”Each action row carries its own controls.

| Control | What it does |
|---|---|
| Preview | Opens the preview described above. Available on Templated Message actions. |
| Run Action | Generates messages for the target segment. Stays disabled until the action has a sender. |
| Duplicate | Copies the action, so you can vary one thing without rebuilding it. Shown as an icon. |
| Delete | Removes the action from the campaign. Shown as an icon. |
| Edit | Reopens the full form. |
| › | Expands the row to show the action’s instructions and target segment, read-only. |
Campaigns themselves can be edited from Edit on the campaign row, and switched between active and inactive without deleting them.
Going Further
Section titled “Going Further”A campaign can do more than ask a question and record the answer. Each of these is built from the pieces already described — a response, its destination, and its instructions.
Send Members to a Registration Page
Section titled “Send Members to a Registration Page”Two approaches, depending on how direct the experience should be:
- Custom URL — sends the member straight to the registration page, with no message in between. Best when the page speaks for itself.
- Concierge Chat — adds a thank-you or a line of context before the link, with the link written into the Concierge Instructions. Best for event campaigns that need a personal touch, or when different responses need different links.
For example: “For members who click ‘Yes, I want to attend’ — thank them and show a short supportive message. Include this registration link: https://yourwebsite.org/register. For members who click ‘Send me the details’ — briefly explain the event and include this event page link: https://yourwebsite.org/upcoming-events.”
Tag Members by What They Clicked
Section titled “Tag Members by What They Clicked”Set this in Tags to Add on each response — no written instructions needed. When a member clicks, Engage applies the tag to their profile, and that tag becomes a filter you can build a segment from later.
| Response | Tags to Add | Add to Kanban |
|---|---|---|
| I’d like to volunteer | potential-volunteer | potential-volunteer |
| Send me upcoming events | event-interest | No change |
| I need help | needs-support | needs-help |
| Not right now | low-engagement | low-engagement |
Share a Video
Section titled “Share a Video”Set this in the Concierge Instructions for the relevant response. After the click, the Concierge shows a brief message with the link in it.
For example: “If the member clicks ‘Tell me more’ — show a short message introducing the topic and include this video link. Keep the tone warm and helpful. Mention what they’ll learn in one sentence before sharing the link.”
Useful for welcome campaigns, new member onboarding, event promotion, training follow-up, and “here’s how this works” outreach.
Show Different Content per Response
Section titled “Show Different Content per Response”Every response has its own Concierge Instructions, so each click can lead somewhere genuinely different rather than to one shared message.
Take the question “What would you like to hear more about?” with four responses — Upcoming events, Training opportunities, Volunteer roles, Nothing right now. The first three each get their own instructions; the last one is better served by a Thank You Page.
Planning a Campaign
Section titled “Planning a Campaign”Worth answering before you build anything:
- What should the member do next?
- What simple question will reveal that?
- What are the three to five clear response options?
- What should happen after each response?
- What can you offer based on each answer?
Keep it simple. Good campaigns feel like a conversation: one clear question, a few clear choices, one helpful next step.
Troubleshooting
Section titled “Troubleshooting”| Symptom | Cause & fix |
|---|---|
| The run processed far more members than expected | Target Segment was left as No segment (all members). Delete the generated messages from the approval queue before approving anything, then set the segment and run again. |
| Create is greyed out | A required field is still empty — usually the action title or short code. Fill it and the button activates. |
| A tag you typed didn’t stick | Tags must be committed. Type the tag and press Enter; it becomes a chip once attached. |
##FNAME## appears literally in the preview | Check the spelling and casing — it must be exactly ##FNAME##, including both pairs of hashes. |
| The run reports failures | The summary separates successful from failed. Members without a valid email address are the usual cause. Approve the successful messages and investigate the rest. |
| Clicking a response does nothing in the preview | Preview responses stay live for 24 hours, then expire. Generate a fresh preview and try again. |
| Part of the page fails to load or shows an error | Reload the page. A browser tab left open across a release can hold on to stale files; a reload fetches the current version. |
| The campaign isn’t in the list | The list is filtered to Active by default. Switch to All, or search for it by name. |